


Do you know how easily actually to upload your photo on Instagram directly from your PC or Mac? You know, sometimes you need to edit your photo and videos on Mac or pc first before you post it on your IG story. In most cases photos that you shot from your ‘Camera’ (not phone camera)
You will need to transfer the files from camera/phone to PC or Mac, then transfer it back to your smartphone, and you feel not editing your photo pretty well so you repeat the process again.
Whoops! What a troublesome! .. unnecessary disruptive thing actually.
So in this post, I will share some on how actually you don’t need to transfer back your photo after done editing from computers to your phone again just to put it on your Instagram profile. You can do it directly from Windows your computers. It will be useful if you are a Photographer or . What you need is your Internet browser. Ya! just using your browser.
If you are a Mac user, the browser that works to do the task is Safari and for Windows user, I found that the only browser that works is Google Chrome. Yeah! no need other software, just using browser.
You may say; I’ve tried that, there is no [+] upload button on it!
Ya! you’re right, that’s why here we gonna make them have the [+] ‘icon’ button just like on your smartphone to upload your photos.
Ok, so lets start it with how to do it on Windows first.
Using Google Chrome to upload photo to instagram profile on Windows
To do it, just open Google Chrome browser if you don’t have one you can download it first.
Go to the Instagram website and log in with your IG account, what you see now is a desktop version of Instagram. You can’t upload a photo through it. You see no [+] icon button to upload the on it.
So lets do a simple hack to fix it.
In Chrome browser go to three dots in the right top on chrome (thats the ‘Menu button’) click it and then go to ‘More tools’ then ‘Developer tools’
Or simply using this keyboard command by pressing in the same times Control + Sift + I see screenshot below

New window for developer tools will shows up.
Then in developer tools window, you can see a tinny icon of phone/tablet in the left top of it, that’s the ‘magic buttons’
Just click it and tadaa! Now you see the mobile responsive version of Instagram just like on your phone.

Now you can upload your photos with the camera button.
Enjoy!
Using Safari to upload photo on Instagram from Mac
To to do it on your Mac computer, open Safari browser and go to the website. In Safari menu bar go to Safari > Preferences
In System Preferences go to Advanced settings tab.
In Advanced settings tab check the box of ‘Show menu in menu bar’ and close the Preferences window. see screenshot below

Now you will see the develop menu in Safari menu bar. Click on it and click ‘Enter Responsive Design Mode’ while you are at the tab.
Oops! There are no Camera icon buttons to upload the photo, and there is a yellow triangle warning sign, in the right on Responsive Design.
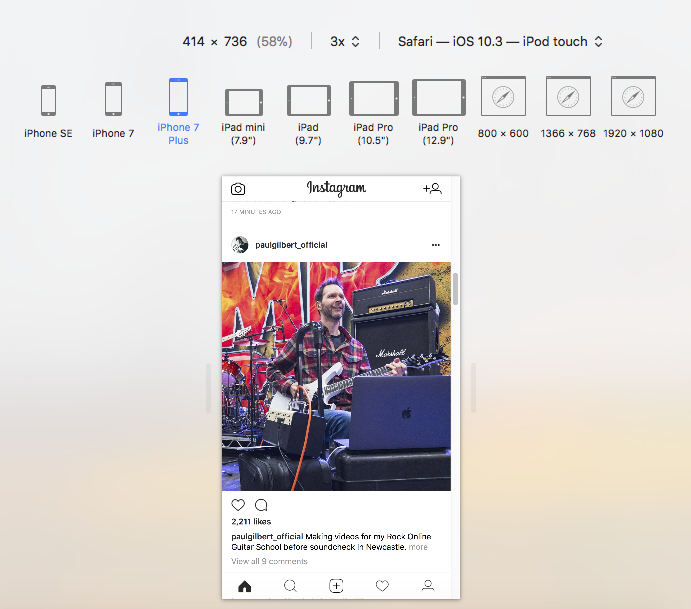
Don’t worry, just click on ‘iOS – iPhone’ version option and change to Safari – iOS 10.3 – iPod touch version.


And once again Tadaa!
Now you should see that Goddamn [+] button to upload your photos directly from your computers.
And now you will be able to upload all your photos to your Instagram profile from your Mac.
Enjoy!
Oh ya! you can also choose the mode you like, you can choose iPhone SE, iPhone 7, iPhone plus and also the model of Apple iPad as well.
Easy right?
Okay, folks! hope this post useful for ya. Have a great day!